People are the recipients of messages and calls in your IM-Notify system. Information is delivered to people using a variety of media which is set up during the adding process. Once a person is added you may make changes to them at any time. Keep in mind that the changes can affect the media which the user receives information for the groups they belong to. Whenever a person is added they will receive a welcome email that contains information about IM-Notify and what, if any, things they need to do to access and use the software.
There are two ways to add people: adding people for app and non-app users, and adding app users only.
Adding app and non-app users
To see the ‘+’ button you will need to have selected ‘People’ in the menu.
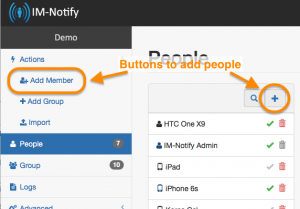
Buttons used to add people
Steps
 Click on the add people button shown above. The following menu will appear:
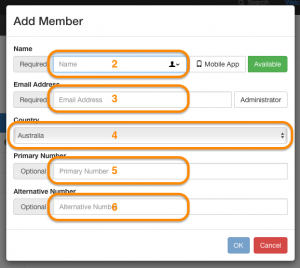
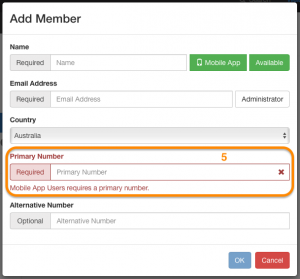
Add people dialog
 [Mandatory] Enter the user’s name and surname
 [Mandatory] Enter the user’s email address.
NOTE
- The email address is the key identifier for a person, and therefore must be unique: i.e. no user can have the same email as someone else in the system, e.g. group emails.
- The email address is also used as the persons’ login name
 [Mandatory] Select the country that this person resides in. This information is used to ensure correct phone number formatting is used and guarantees the country code for the number will work.
 [Optional] Enter the users phone contact number. *A phone number is mandatory if the user is going to use the mobile app.*
 [Optional] Enter an alternate phone number for this user. This is used as a second point of contact for services that use the Alert Conference or Alert Voice Message function.
 Press the ‘OK‘ button to add this new user.
Adding app users
The following are additional steps to add a person who is going to use the mobile app. Please note that even if the user doesn’t register for the app they will still receive messages to their email and their defined mobile phone. These steps may be done before or after the previous steps. If after, then the following steps assume that you haven’t already clicked OK outlined in the steps above. The following steps are all mandatory.
Steps
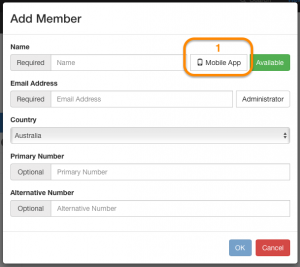
Initiate adding an app user process
Click on the ‘Mobile App‘ button for this user. The menu below will appear next to the Mobile App button.
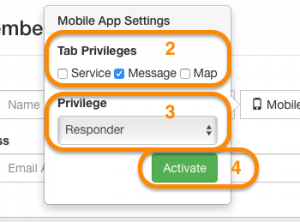
Mobile app settings
Define the Tab privileges (more information on tabs) for this user. These are the tab buttons that appear at the bottom (on iOS) or top (on Android) of the app. Checking the box beside each tab type will make this tab visible and functional for this person. See the Mobile App section for more information on the tabs.
Using the drop down menu select the privilege this person will have while using the app. For more information on the privileges see the ‘Mobile App‘ section.
Click ‘Activate‘ to enable the mobile app functionality for this user.
App users require a valid mobile number
Using the mobile app requires this person to have a valid mobile number for the country chosen. This is the only way for people to register as a mobile user. Note that the mobile app button will have turned green, indicating that the mobile app is now enabled for this person.
NOTE: numbers input for mobile users must be unique – the system will warn you if the number does not meet the requirement.
Once all the details for both the app user and non-app user have been met, click the OK button to add this user. When the user has been added successfully they will appear in the people list. You may need to move between list pages to see this user.